
THE MOST POWERFUL AND COMPLETE GUN DATABASE SOFTWARE, AMMO AND RANGE DATABASE EVER OFFERED
UPDATING YOUR CURRENT VERSION OR UPGRADING TO A
DIFFERENT VERSION
Upgrading and importing your firearms database takes about 5 minutes. It is not an automatic operation because of the security of your database not being "installed" on your computer. You have 5 separate databases in the program (4 if you have the X-LITE version): FIREARM RECORDS, THE AMMO DUMP, ACCESSORIES, RANGE RECORDS and CONTACTS. Each of these databases must be imported separately.
The first step is to BACKUP your old files. Copy the entire folder to another location of your choice. Perhaps make a couple of copies. Then follow the steps below and WATCH THE VIDEO!
PLAY THIS VIDEOS FULL SCREEN
QUICK GUIDE TO UPGRADE & IMPORT DATA
NOTE: If you have already entered some new records into your new upgrade, whatever you import now will be added to the existing records.
STEP ONE
AFTER you have made BACKUPS of your older database, open the new version.
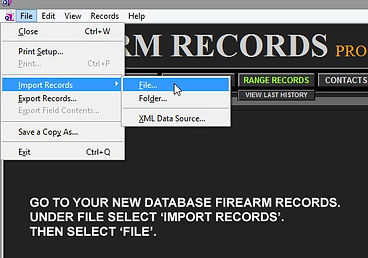
You can start your importing of your old version database records from any of the five database screens, but we will start here with the FIREARM RECORDS.
In FIREARM RECORDS, select 'FILE' > 'IMPORT RECORDS' > 'FILE'.

STEP TWO
Find your old program folder from from which you want to import the records from.
NOTE: Make sure 'Files of type" says: "Filemaker Runtime Files (*fmpur).
Double-click on the file: 'DATABASE DATA.fmpur'.

STEP THREE
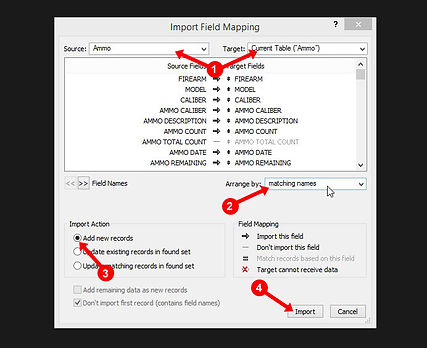
You will be presented with the following screen.
1. Make SURE your Source matches the Target. In this case, "WEAPONS". Your Target is the new upgrade, your Source is the old you want to import from.
2. Make sure Arrange by says "MATCHING NAMES".
3. This is usually the proper default, but make sure Import Action is "ADD NEW RECORDS".
4. Click Import.

STEP FOUR
You will be presented with the following screen.
1. Under Import Options make sure "Perform auto-enter..." is checked.
2. Click Import.
THAT'S IT! Your FIREARMS have been imported. Now, you repeat these steps for the other four sections (databases).
NEXT
Now we will repeat steps:
Go to THE AMMO DUMP.
Select 'FILE' > 'IMPORT RECORDS' > 'FILE'.
1. Make SURE your Source matches the Target. In this case, "AMMO".
2. Make sure Arrange by says "MATCHING NAMES".
3. This is usually the proper default, but make sure Import Action is "ADD NEW RECORDS".
4. Click Import.

NEXT
Go to ACCESSORIES.
Select 'FILE' > 'IMPORT RECORDS' > 'FILE'.
1. Make SURE your Source matches the Target. In this case, "MAINTENANCE".
2. Make sure Arrange by says "MATCHING NAMES".
3. This is usually the proper default, but make sure Import Action is "ADD NEW RECORDS".
4. Click Import.

NEXT
Go to RANGE RECORDS (PRO and LITE versions only).
Select 'FILE' > 'IMPORT RECORDS' > 'FILE'.
1. Make SURE your Source matches the Target. In this case, "RANGE".
2. Make sure Arrange by says "MATCHING NAMES".
3. This is usually the proper default, but make sure Import Action is "ADD NEW RECORDS".
4. Click Import.

NEXT
Go to CONTACTS.
Select 'FILE' > 'IMPORT RECORDS' > 'FILE'.
1. Make SURE your Source matches the Target. In this case, "CONTACTS".
2. Make sure Arrange by says "MATCHING NAMES".
3. This is usually the proper default, but make sure Import Action is "ADD NEW RECORDS".
4. Click Import.
IMPORTANT NOTE: ALWAYS MAKE BACKUP COPIES BEFORE YOU UPDATE! IF YOU HAVE PDFs, VIDEOS, or CUSTOM ICONS in the old folder remember to move them to your new update folder.
THAT'S IT! YOUR DONE. This is a process that only needs to happen during upgrades. Once you get use to these steps, it's not a big deal- and you'll even find it an advantage in the future because you can just import what you may want to recover from mistakes.